Using Docker at runtime in PyCharm
Note: This guide requires you to have both Linux (I am using Ubuntu 18.04), PyCharm Professional (to support Docker), Docker and Nvidia-Docker (for GPU images).
In this post I will write my workflow for using Pycharm and Docker (docker-compose) together. The benefit of this approach is:
- You have full control of the entire OS - not just the Python packages like when you use
anacondaorpipenv. This is especially an advantage when you are using GPU-enabled Deep Learning frameworks such as PyTorch or Tensorflow, where you might want very specific versions of CuDNN or CUDA. - If stuff breaks - no big deal, we will just create a new container.
- All your code (and data) will be automatically uploaded and synchronized to your docker container when there are updates.
- Everything will be running “behind-the-scenes”, meaning that your development in Pycharm will be very similar to your regular workflow.
To explain the setup as thoroughly as possible, we will show all the neccessary steps to get a GPU-enabled Tensorflow up and running. The steps for any other DL framework will be nearly identical.
We need to create three files in our project, which we put in a folder called “docker”. The three files are:
- Dockerfile
- docker-compose.yml
- requirements.txt

Let’s go through the steps!
1. Dockerfile
For people unfamiliar with Dockerfile, it essentially forms a blueprint or recipe for creating Docker images, which will be used for deploying Docker containers subsequently. There are several excellent online guides that explain this in more detail, which I highly recommend if you are new to Docker.
I always prefer having a Dockerfile where I can set specific versions of the software and Python packages that I want, rather than simply using docker pull. There exists an excellent repo ufoym/deepo created by Ming Yang. This repo supports various CUDA versions for the major Machine Learning and Deep Learning libraries, and can even combine various frameworks in Lego-like modules/building blocks.
For this specific example we will be using a GPU-enabled Tensorflow Dockerfile. As I have an Nvidia 2080 GTX TI graphics card (with CUDA 10.1), I will be using the following Dockerfile for Tensorflow 2.1.0 (current version) from the official Tensorflow Github.
We have made some minor adjustments to the original Dockerfile - such as having python-tk and the requirements.txt file, so the final Dockerfile looks as follows:
# Copyright 2019 The TensorFlow Authors. All Rights Reserved.
#
# Licensed under the Apache License, Version 2.0 (the "License");
# you may not use this file except in compliance with the License.
# You may obtain a copy of the License at
#
#     http://www.apache.org/licenses/LICENSE-2.0
#
# Unless required by applicable law or agreed to in writing, software
# distributed under the License is distributed on an "AS IS" BASIS,
# WITHOUT WARRANTIES OR CONDITIONS OF ANY KIND, either express or implied.
# See the License for the specific language governing permissions and
# limitations under the License.
# ============================================================================
#
# THIS IS A GENERATED DOCKERFILE.
#
# This file was assembled from multiple pieces, whose use is documented
# throughout. Please refer to the TensorFlow dockerfiles documentation
# for more information.

ARG UBUNTU_VERSION=18.04

ARG ARCH=
ARG CUDA=10.1
FROM nvidia/cuda${ARCH:+-$ARCH}:${CUDA}-base-ubuntu${UBUNTU_VERSION} as base
# ARCH and CUDA are specified again because the FROM directive resets ARGs
# (but their default value is retained if set previously)
ARG ARCH
ARG CUDA
ARG CUDNN=7.6.4.38-1
ARG CUDNN_MAJOR_VERSION=7
ARG LIB_DIR_PREFIX=x86_64
ARG LIBNVINFER=6.0.1-1
ARG LIBNVINFER_MAJOR_VERSION=6

ARG DEBIAN_FRONTEND=noninteractive

# Needed for string substitution
SHELL ["/bin/bash", "-c"]
# Pick up some TF dependencies
RUN apt-get update && apt-get install -y --no-install-recommends \
        build-essential \
        cuda-command-line-tools-${CUDA/./-} \
        # There appears to be a regression in libcublas10=10.2.2.89-1 which
        # prevents cublas from initializing in TF. See
        # https://github.com/tensorflow/tensorflow/issues/9489#issuecomment-562394257
        libcublas10=10.2.1.243-1 \
        cuda-nvrtc-${CUDA/./-} \
        cuda-cufft-${CUDA/./-} \
        cuda-curand-${CUDA/./-} \
        cuda-cusolver-${CUDA/./-} \
        cuda-cusparse-${CUDA/./-} \
        curl \
        libcudnn7=${CUDNN}+cuda${CUDA} \
        libfreetype6-dev \
        libhdf5-serial-dev \
        libzmq3-dev \
        pkg-config \
        software-properties-common \
        unzip

# Install TensorRT if not building for PowerPC
RUN [[ "${ARCH}" = "ppc64le" ]] || { apt-get update && \
        apt-get install -y --no-install-recommends libnvinfer${LIBNVINFER_MAJOR_VERSION}=${LIBNVINFER}+cuda${CUDA} \
        libnvinfer-plugin${LIBNVINFER_MAJOR_VERSION}=${LIBNVINFER}+cuda${CUDA} \
        && apt-get clean \
        && rm -rf /var/lib/apt/lists/*; }

# For CUDA profiling, TensorFlow requires CUPTI.
ENV LD_LIBRARY_PATH /usr/local/cuda/extras/CUPTI/lib64:/usr/local/cuda/lib64:$LD_LIBRARY_PATH

# Link the libcuda stub to the location where tensorflow is searching for it and reconfigure
# dynamic linker run-time bindings
RUN ln -s /usr/local/cuda/lib64/stubs/libcuda.so /usr/local/cuda/lib64/stubs/libcuda.so.1 \
    && echo "/usr/local/cuda/lib64/stubs" > /etc/ld.so.conf.d/z-cuda-stubs.conf \
    && ldconfig

ARG USE_PYTHON_3_NOT_2
ARG _PY_SUFFIX=${USE_PYTHON_3_NOT_2:+3}
ARG PYTHON=python${_PY_SUFFIX}
ARG PIP=pip${_PY_SUFFIX}

# See http://bugs.python.org/issue19846
ENV LANG C.UTF-8

RUN apt-get update && apt-get install -y \
    python3 \
    python3-pip

RUN python3 -m pip --no-cache-dir install --upgrade \
    pip \
    setuptools

# Some TF tools expect a "python" binary
RUN ln -s $(which python3) /usr/local/bin/python

# Options:
#   tensorflow
#   tensorflow-gpu
#   tf-nightly
#   tf-nightly-gpu
# Set --build-arg TF_PACKAGE_VERSION=1.11.0rc0 to install a specific version.
# Installs the latest version by default.
ARG TF_PACKAGE=tensorflow
ARG TF_PACKAGE_VERSION=
RUN python3 -m pip install --no-cache-dir ${TF_PACKAGE}${TF_PACKAGE_VERSION:+==${TF_PACKAGE_VERSION}}

WORKDIR /tmp

COPY requirements.txt /tmp

RUN pip install -r requirements.txt
2. docker-compose.yml
Docker-compose.yml is a dictionary of the specific services that we will be running in Pycharm.
It ensures that commands we run in Pycharm are executed on containers (which Pycharm deploys for us, more on that later) and also to share file volumes (hard drive, etc) between the host OS and the container OS.
It should look as follows
version: '3'

services:
  tensorflow36_gpu:
    build:
      context: .
      dockerfile: Dockerfile
      args:
      - CACHEBUST=2
    Volumes:
    - /path/to/host/project/:/path/to/container
    environment:
    - NVIDIA_VISIBLE_DEVICES=all
Remember to change the paths of the above “Volumes” to your specific repo and /path/to/container can be “/data” for example.
3. requirements.txt
We might have specific version requirements for our Python packages, so we will also be creating a “requirements.txt” file. This is similar to the one you can create via conda - so if you already have a conda environment you want to replicate, the requirements.txt file you can generate via the conda terminal will make this easy.
For now we only have the following content in our requirements.txt file:
numpy
keras
matplotlib
Pycharm
Now we will go through the steps required in Pycharm to setup the docker integration. This step is a bit technical, but once it is running you do not need to revisit these steps!
I have tried attaching screenshots to make your life easier here.
1. First, go into Settings –> Build, Execution, Deployment –> Docker
Ensure that you have the following message “Connection successful”

2. Next, go into Settings –> Project: [“Name of project”] –> Project Interpreter –> Click the gearbox icon and click “Add..”
- Then select “Docker Compose”
- Make sure your settings look as follows:

Next, simply press “OK”
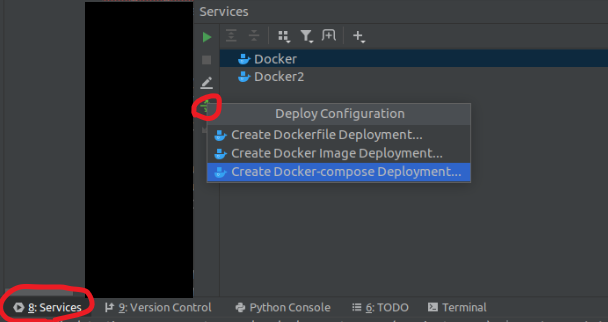
3. Then we create a docker-compose deployment via the “Services” tab in the bottom of the Pycharm IDE as follows:

Now we are ready!
If you go into Python Console you should see that the interpreter is running via docker-compose. That means, that all commands will be running in containers rather than directly in our local environment.
If you have updates to your Dockerfile, you need to do the following to update docker-compose deployment:

Let’s test that Tensorflow is working with GPU support!
import tensorflow as tf
tf.config.list_physical_devices('GPU')
2020-01-21 14:59:02.580445: I tensorflow/core/common_runtime/gpu/gpu_device.cc:1555] Found device 0 with properties:
pciBusID: 0000:03:00.0 name: GeForce RTX 2080 Ti computeCapability: 7.5
coreClock: 1.62GHz coreCount: 68 deviceMemorySize: 10.76GiB deviceMemoryBandwidth: 573.69GiB/s
2020-01-21 14:59:02.580583: I tensorflow/stream_executor/platform/default/dso_loader.cc:44] Successfully opened dynamic library   libcudart.so.10.1
2020-01-21 14:59:02.580618: I tensorflow/stream_executor/platform/default/dso_loader.cc:44] Successfully opened dynamic library libcublas.so.10
2020-01-21 14:59:02.580697: I tensorflow/stream_executor/platform/default/dso_loader.cc:44] Successfully opened dynamic library libcufft.so.10
2020-01-21 14:59:02.580734: I tensorflow/stream_executor/platform/default/dso_loader.cc:44] Successfully opened dynamic library libcurand.so.10
2020-01-21 14:59:02.580770: I tensorflow/stream_executor/platform/default/dso_loader.cc:44] Successfully opened dynamic library libcusolver.so.10
2020-01-21 14:59:02.580805: I tensorflow/stream_executor/platform/default/dso_loader.cc:44] Successfully opened dynamic library libcusparse.so.10
2020-01-21 14:59:02.580834: I tensorflow/stream_executor/platform/default/dso_loader.cc:44] Successfully opened dynamic library libcudnn.so.7
2020-01-21 14:59:02.582399: I tensorflow/core/common_runtime/gpu/gpu_device.cc:1697] Adding visible gpu devices: 0
[PhysicalDevice(name=u'/physical_device:GPU:0', device_type=u'GPU')]
import tensorflow as tf
with tf.device('/gpu:0'):
    a = tf.constant([1.0, 2.0, 3.0, 4.0, 5.0, 6.0], shape=[2, 3], name='a')
    b = tf.constant([1.0, 2.0, 3.0, 4.0, 5.0, 6.0], shape=[3, 2], name='b')
    c = tf.matmul(a, b)
    print(c)
tf.Tensor(
[[22. 28.]
[49. 64.]], shape=(2, 2), dtype=float32)